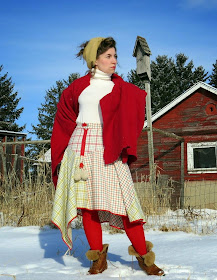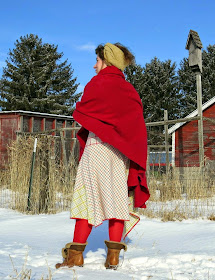
The waistband and yoke assembly were drafted off my favorite pencil skirt pattern. After sewing the front and back darts, I pinned it to the dressform and started draping the skirt pieces. I matched up edges, cut out large triangles, repositioned edges and trimmed off weird spots until it hung the way I wanted. Let me tell you, it's pretty daunting to run a diagonal slice through your yard of wool with no back-up plan! Perhaps the hardest part was matching the skirt pieces together on the vertical seams once I had them hung satisfactorily off the yoke. I also wanted the skirt to be more circular than a-line so working the fullness into the yoke was also tricky. In short, I learned a bit about bias.
And because an asymmetrical, handkerchief hemline was not quirky enough, I decided to play with the skirt closure. I've done millions of side- and back-zip skirts, but was quite pleased when this past Summer I tried my first dart-zipper on my burlap skirt. Running the zipper in place of the front waist dart draws attention to the zipper, but if both sides are curved, as you would normally do for a dart, it still functions as a fitting element, lending a proper curve over hip. For this application, I decided to do an exposed zipper. Incidentally, when that trend first hit the scene, I thought it was hideous and swore I would never do it. Never say never!
But the heavy red stripe of zipper was the perfect accent to the pair of little hands. These are old school mitten clips. The left hand IS the closure on the waistband. The skirt is inserted into the silver clamp, and when the red hand folds down flat, over the clamp, it is snapped closed. And no fear of this popping open. Mothers would never trust their children's mittens to faulty clips. These little hands got grip!
 |
| my cat, Dreizehn, on his way to visit the rams |
Working without a pattern certainly edged me out of my comfort zone, but I'm glad I did it. Once you get the foundation set and the project starts to take shape, it sort of just leads you wherever IT wants to go. Perhaps the key is to be flexible enough to see different possibilities and have the courage to take it one step further. The exposed zipper led to the mitten clips which led to the silly pompoms which ended in a tiny edging of red along the hemline. Strange, independent design elements, but when put all together, it works!
Homestead Notes: These photos were taken on the south side of our chicken coop, where also stands our rarely inhabited bat house. Even after all these years, they still reside in the attic!


SUPER nice! Love it! You are so talented
ReplyDeletewow!
ReplyDeleteand extra wow because it´s your first draping project!!! this is a very good "fingerübung" for future projects. love the different plaids and the fresh colors!
believe or not - the first exposed zippers that i saw a few years ago made me think: "pah - soo 80´s! never again!" but - like you - i then made some in skirts and even in a top (at the back) :-)
xxxxx
I love the way you put all of the plaids together! I am just getting started sewing, but I want to be that good when I grow up. :) Coming over from the Farmgirl Friday Blog Hop!
ReplyDelete